ZenML Pipeline Tutorial Part 1: How to Use ZenML for Building a Machine Learning Pipeline
Introduction
In this tutorial, we will explore how to use ZenML to build a machine learning pipeline that performs data loading, model training, and evaluation. We will use the popular Iris dataset and a RandomForestClassifier for our machine learning task. Let’s get started!
Prerequisites
Before we dive into the code, ensure that you have the following installed:
- Python 3.8 or later
- ZenML: Install it via pip
pip install zenml - Other necessary libraries: Scikit-learn and NumPy
pip install scikit-learn numpy
Understanding ZenML: Pipelines and Steps
ZenML enables users to create robust ML workflows through the distinction of two core concepts: pipelines and steps.
Pipelines
In ZenML, a pipeline is a directed acyclic graph (DAG) that represents a sequence of operations in your machine learning workflow. Think of pipelines as the overall orchestration of your ML tasks. Each pipeline encapsulates all the steps necessary to achieve a goal, such as training a model or fine-tuning hyperparameters. Pipelines facilitate collaboration by allowing teams to manage and execute their workflows consistently and reliably.
Steps
Each operation within a pipeline is defined as a step. Steps are discrete units of work connected sequentially within a pipeline. They can represent functions like loading data, training a model, or evaluating performance. In ZenML, steps are decorated with the @step decorator, indicating that they will be part of a pipeline. Steps can take inputs, process those inputs, and outputs can be shared with subsequent steps. This modularity encourages reuse and simplifies maintenance.
Example
In the tutorial example, we define a pipeline called training_pipeline, which consists of three main steps: loading data, training the model, and evaluating it. Each step uses specific functions to perform its task, and they work together to form a comprehensive ML workflow.
Project Structure
Make sure your project has the following structure:
/your_project
  ├── /pipelines
  │    └── training_pipeline.py
  └── /steps
       ├── load_data_step.py
       ├── train_model_step.py
       └── evaluate_model_step.py
Step 1: Define the Pipeline
In the pipelines/training_pipeline.py file, we will define our ZenML pipeline. This pipeline will include steps for loading data, training the model, and evaluating it.
import sys
import os
from zenml import pipeline

# Add the parent directory to the module search path
sys.path.append(os.path.abspath(os.path.join(os.path.dirname(__file__), '..')))

from steps.load_data_step import load_data
from steps.train_model_step import train_model
from steps.evaluate_model_step import evaluate_model

@pipeline(name="Tutorial", enable_cache=False)
def training_pipeline():
    X_train, X_test, y_train, y_test = load_data()
    model = train_model(X_train, y_train)
    evaluate_model(model, X_test, y_test)

if __name__ == "__main__":
    training_pipeline()
Step 2: Create the Data Loading Step
Next, create the load_data_step.py file in the steps directory. This step will load the Iris dataset and split it into training and testing datasets.
from zenml import step
from typing import Tuple
from sklearn.datasets import load_iris
from sklearn.model_selection import train_test_split
import numpy as np
import logging
from typing import Annotated

@step
def load_data() -> Tuple[
    Annotated[np.ndarray, "X_train"],
    Annotated[np.ndarray, "X_test"],
    Annotated[np.ndarray, "y_train"],
    Annotated[np.ndarray, "y_test"],
]:
    """Load the Iris dataset and split it into training and testing data."""
    logging.info("Loading iris dataset...")
    data = load_iris()
    logging.info("Splitting train and test data...")
    X_train, X_test, y_train, y_test = train_test_split(
        data.data, data.target, test_size=0.2, random_state=42
    )
    return X_train, X_test, y_train, y_test
Step 3: Create the Model Training Step
Now, we define the model training step in train_model_step.py. This step will train a RandomForestClassifier on the training dataset.
from zenml import step
from sklearn.ensemble import RandomForestClassifier
from typing import Annotated
import numpy as np

@step(enable_cache=False)
def train_model(
    X_train: Annotated[np.ndarray, "X_train"],
    y_train: Annotated[np.ndarray, "y_train"]
) -> RandomForestClassifier:
    """Train a RandomForest model on the training data."""
    model = RandomForestClassifier()
    model.fit(X_train, y_train)
    return model
Step 4: Create the Model Evaluation Step
Finally, we will create the model evaluation step in evaluate_model_step.py. This step will evaluate the trained model on the test dataset and print the accuracy.
from zenml import step
from sklearn.metrics import accuracy_score
import logging
from typing import Annotated
from sklearn.ensemble import RandomForestClassifier
import numpy as np

@step(enable_cache=False)
def evaluate_model(
    model: RandomForestClassifier,
    X_test: Annotated[np.ndarray, "X_test"],
    y_test: Annotated[np.ndarray, "y_test"]
) -> None:
    """Evaluate the trained model on the test data."""
    logging.info("Evaluating the model...")
    predictions = model.predict(X_test)
    accuracy = accuracy_score(y_test, predictions)
    logging.info(f"Model accuracy: {accuracy}")
    print(f"Accuracy: {accuracy}")
Step 5: Run the Pipeline
Now that everything is set up, you can run your pipeline. Open your terminal, navigate to your project directory, and execute the following command:
python pipelines/training_pipeline.py
After the run you can access to your zenml server and get the information about your pipeline:
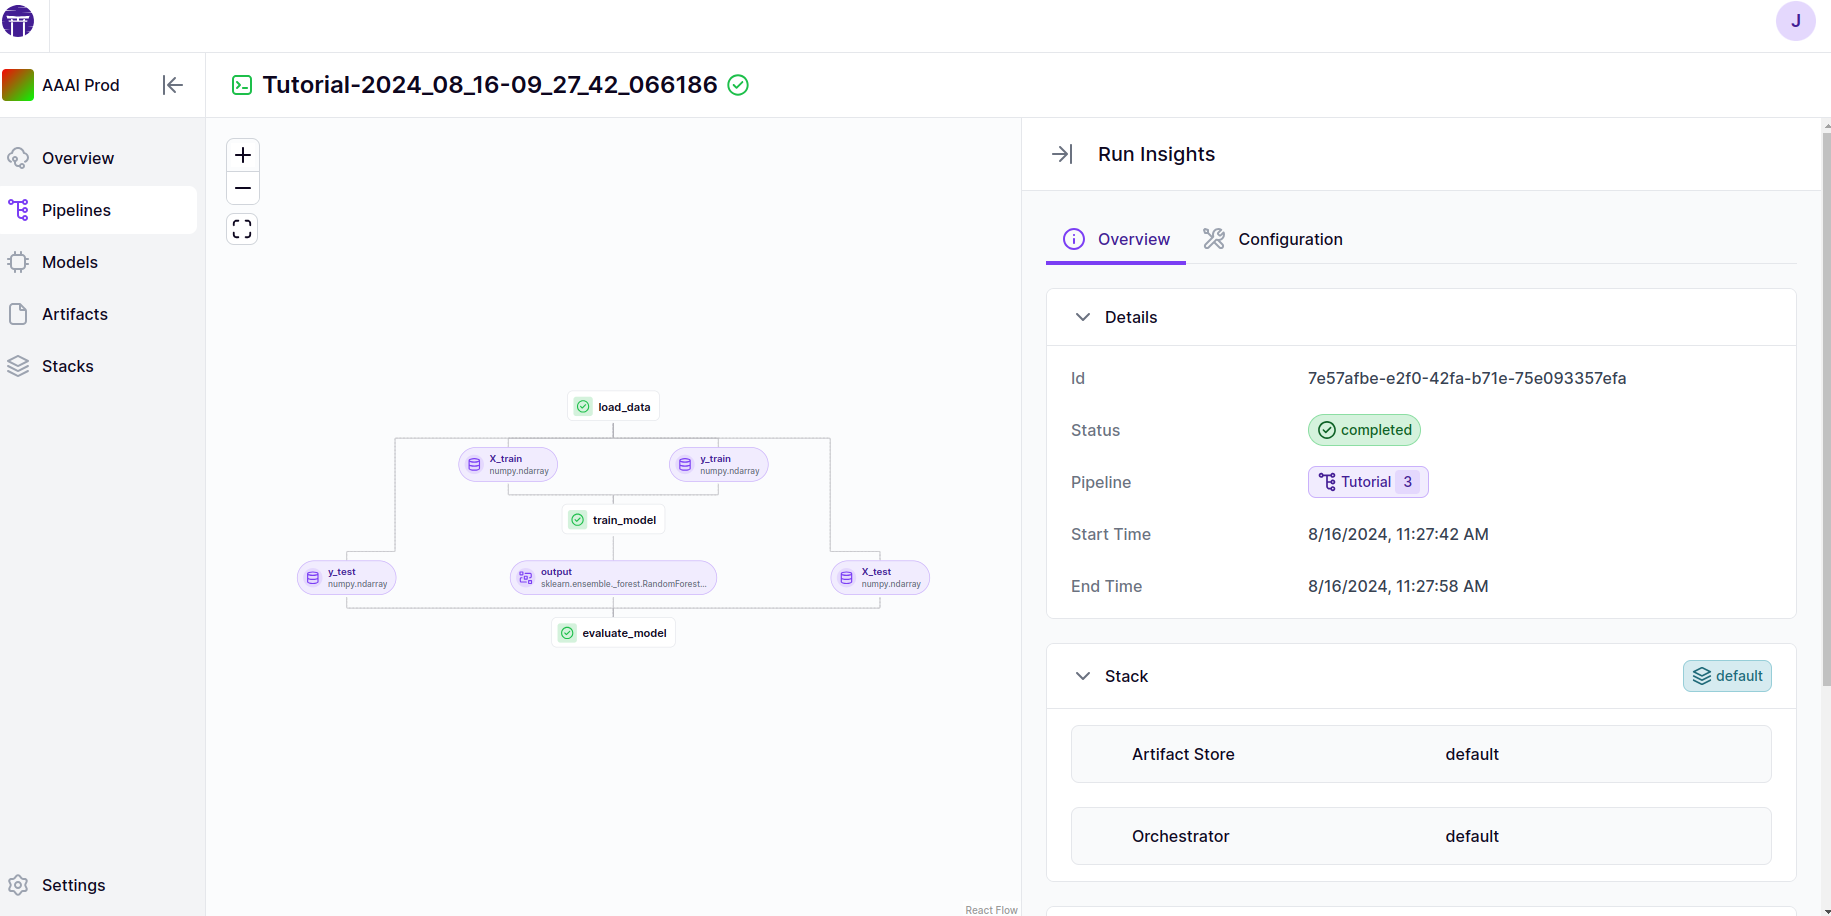
This screenshot shows a ZenML pipeline run overview, highlighting the successful execution of a pipeline named “Tutorial-2024_08_16-09_27_42_066186.” The visual flow on the left displays the pipeline’s components, including loading data, training a RandomForest model, and evaluating the model. The run status is marked as “completed,” with start and end times provided, indicating a swift and successful run. The details panel on the right also includes information about the stack, including the artifact store and orchestrator used in this pipeline.
Conclusion
Congratulations! You have successfully set up and run a basic machine learning pipeline using ZenML. This tutorial demonstrated how to define a pipeline, load data, train a model, and evaluate its performance. You can extend this pipeline by adding more steps, integrating different models, or experimenting with other datasets. You can find the repository here: https://github.com/JulienHeiduk/zenml-ml. Happy coding!